vue 头像裁剪
1 安装 vue-cropper
npm install vue-cropper
2 在需要调用的页面引入
import Vue from 'vue'
import VueCropper from 'vue-cropper';
Vue.use(VueCropper);
demo
js代码,注意我同时引进了其它的组件
import Vue from 'vue'
import VueCropper from 'vue-cropper';
Vue.use(VueCropper);
import { Toast } from 'vant';
import TopBar from '../../components/TopBar.vue'

Vue.use(Toast);

export default {
  name: 'SetHeadimg',
  components:{TopBar},
  data() {
    return {
      options: {
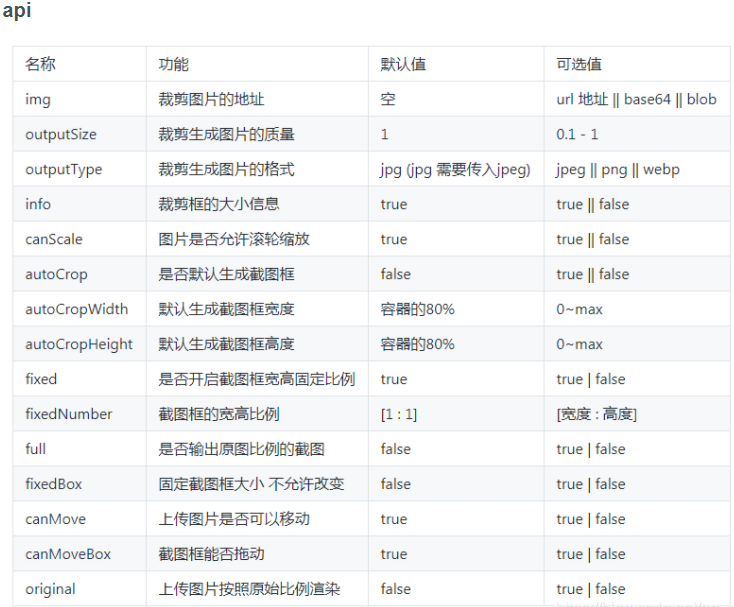
        autoCrop: true, //默认生成截图框
        fixedBox: true, //固定截图框大小
        canMoveBox: false, //截图框不能拖动
        centerBox: false, //截图框被限制在图片里面
        autoCropWidth:150,  //截图框宽度
        autoCropHeight:150, //截图框高度
      },
      previews: {}, //实时预览图数据
      attach: {
        //后端附件表
        id: "",
        userId: "",
        customaryUrl: "", //原图片路径
        laterUrl: "", //裁剪后图片路径  /static/logo.png
        attachType: "photo" //附件类型
      },
	  upText:'上传图片'
    };
  },
  methods: {
    //实时预览
    realTime(data) {
      this.previews = data;
    },
    //点击图片调取input
    clickUpload(){
      this.$refs.filElem.dispatchEvent(new MouseEvent('click'))
    },
    //选择本地图片
    uploadImg(e, num) {
      var file = e.target.files[0];
      if (!/\.(gif|jpg|jpeg|png|bmp|GIF|JPG|PNG)$/.test(e.target.value)) {
        Toast("图片类型必须是.gif,jpeg,jpg,png,bmp中的一种");
        return false;
      }
      //fileReader 接口,用于异步读取文件数据
      var reader = new FileReader();
      reader.readAsDataURL(file); //重要 以dataURL形式读取文件
      reader.onload = e => {
        // data = window.URL.createObjectURL(new Blob([e.target.result])) 转化为blob格式
        let data = e.target.result;
        this.attach.customaryUrl = data;
        // 转化为base64
        // reader.readAsDataURL(file)
        // 转化为blob
      };


	  this.upText = '确认修改';
    },
    //确认截图,上传
    confirm(type) {
		//判断上传图片为空,则上传
		if(!this.attach.customaryUrl){
			this.clickUpload();
		}

		//上传
		let that = this;
		this.$refs.cropper.getCropData(res => {
			this.axios.post('/api/member/updateHeadImg',this.$qs.stringify({userid:this.$cookies.get("userId"),headImg:res})).then(function(response) {
				if(response.data.sta == 1){
					Toast({
						icon:'passed',
						message:response.data.msg,
						onClose:function(){that.$router.push('/set');}
					});

				}else{
					Toast.fail('操作失败');
				}

			}).catch(function(error) {console.log(error);});
		});
    },

	//取消
	handleClose(){
		window.history.back();
	}

  }
};
css代码
/* 头像预览 */

.show-preview{
	padding:10px;
}
.show-preview .preview {
  border-radius: 50%;
  overflow: hidden;
  border: 1px solid #cccccc;
  background: #cccccc;
  width: 150px !important;
  height: 150px !important;
  margin:0 auto;
}
.show-preview .title{
	padding:5px;
	text-align:center;
}

.upload-img{
	display:block;
	margin:10px auto;

}

.contro{
	text-align:center;
	padding:15px;
}


#uploads{
	display:none;
}
html代码
<div class="setHeadImg">
<TopBar title="上传头像" rtext=" "></TopBar>
<!-- 裁剪 -->
<vueCropper
style="width:100%;height:300px"
ref="cropper"
:img="attach.customaryUrl"
:autoCrop="options.autoCrop"
:fixedBox="options.fixedBox"
:canMoveBox="options.canMoveBox"
:autoCropWidth="options.autoCropWidth"
:autoCropHeight="options.autoCropHeight"
:centerBox="options.centerBox"
@realTime="realTime"
></vueCropper>
<div class="show-preview">
<div :style="previews.div" class="preview">
<img :src="previews.url" :style="previews.img" width="100%" />
</div>
<h2 class="title">头像预览</h2>
</div>
<input
ref="filElem"
type="file"
id="uploads"
accept="image/png, image/jpeg, image/gif, image/jpg"
@change="uploadImg($event,1)"
class="el-button hide"
style="margin-bottom:15px"
/>
<div class="contro">
<van-button @click="confirm('blob')" square type="primary">{{upText}}</van-button>
<van-button plain @click="handleClose" type="info" size="normal">取消</van-button>
</div>
</div>效果图

插件相关文档

